Clay Masterson, Backcountry Conditioning Expert & Gear Pragmatist
July 08, 2026 · 13 min read
Bushcraft shelter collapse taught me a cold survival lesson
Forty-eight degrees Fahrenheit. That's the temperature the thermometer read when my shelter folded at three in the morning. Not twenty below. Not in a whiteout. Forty-eight and falling rain.
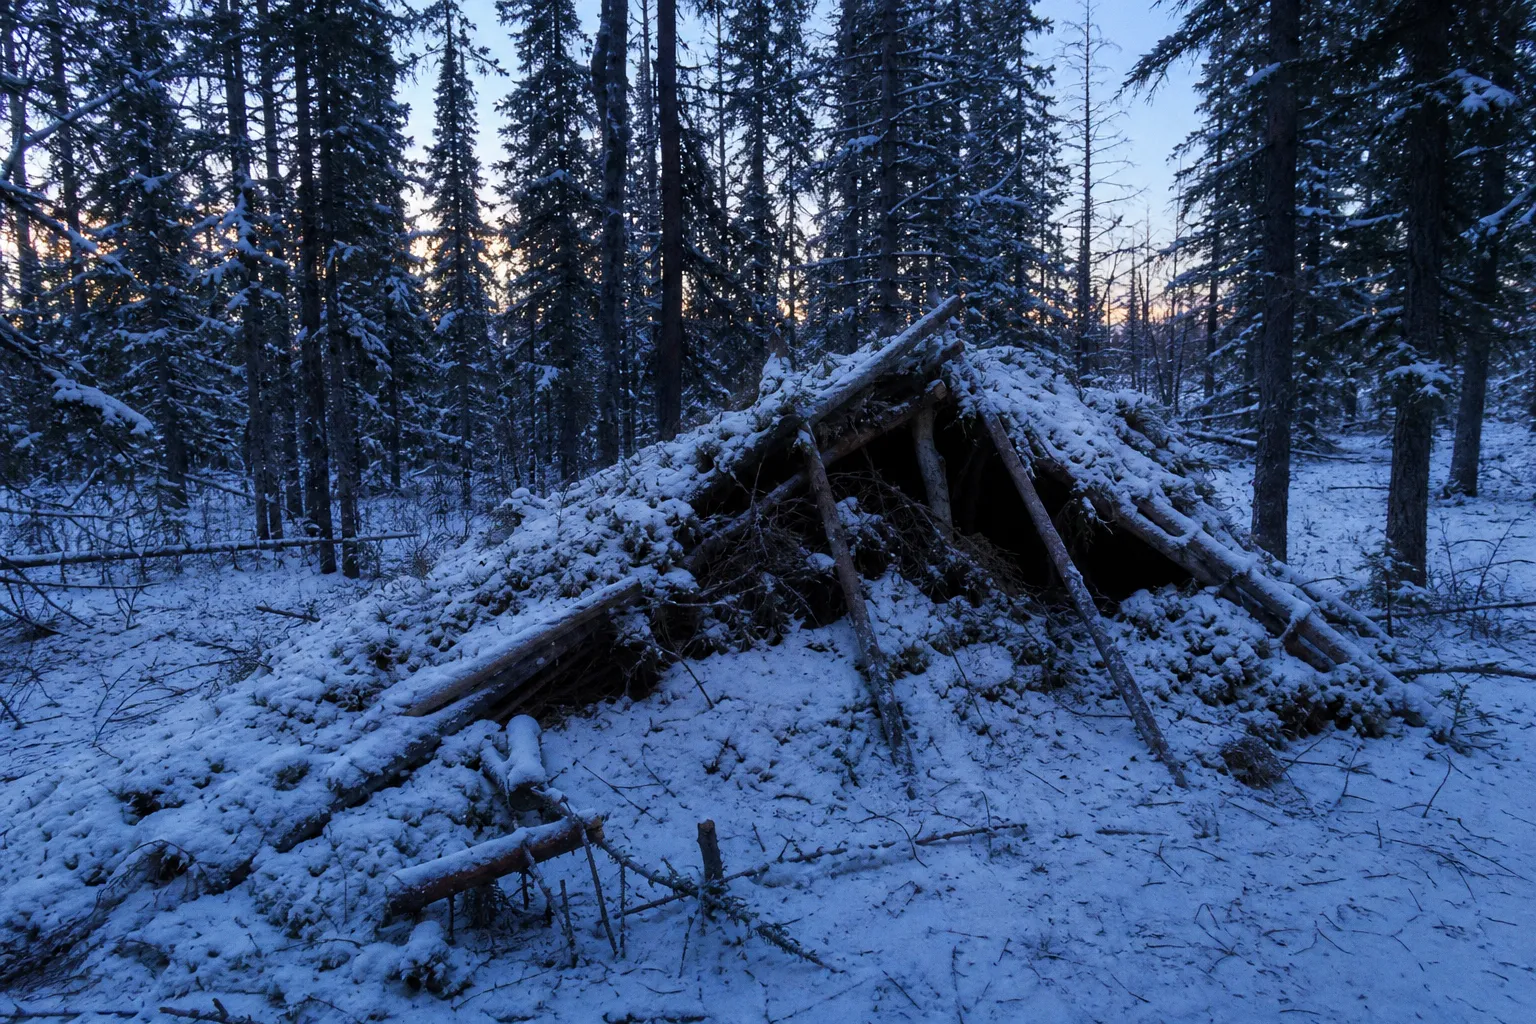
Hypothermia doesn't wait for winter, and neither should your shelter engineering. I lost a ridgepole to rot, lost my insulation to gravity, and nearly lost a night of core temperature regulation that would have followed me straight into mild hypothermia. The entire collapse traced back to two inches of miscalculated ridgepole length and ribs that weren't anchored deep enough into the ground. Here's the cold math I learned in the wreckage.
The anatomy of a structural failure: Why my shelter gave way
A shelter that fails is just a hole in the forest you crawled into on purpose.
When the ridgepole cracked, the debris mat dropped like a soaked blanket onto my chest. Every rib followed inward, pulling the structure into a pile of crossed sticks and oak leaves. I kicked out through the entrance, lay on my back in the rain, and spent the next ninety minutes rebuilding with what was left of the frame. By the time I had a functional lean-to rigged against a standing dead pine, my hands were shaking hard enough that threading paracord through a bowline took three attempts.
The post-mortem was short. I had pulled the ridgepole from a fallen birch that had been on the ground for at least two seasons. The bark looked intact. The wood sounded solid when I rapped it with a knuckle. But the heart was punky, half-rotted from a previous winter's freeze-thaw cycling. When the insulation load hit—eight to ten inches of wet oak leaves, plus another six inches of pine boughs I had piled on top for good measure—the grain gave way at the center point. The ribs, which I had only seated three inches into the soil, simply folded inward as soon as the central support was gone.
That's the pattern in most bushcraft shelter failures. One compromised load-bearing element, and the entire structure torques into collapse under debris weight. The shelter looks fine when it's light. It looks fine when you finish stacking insulation. It looks fine until the load exceeds the weakest point—usually at night, usually in rain, usually when rewarming isn't an option. The failure almost never announces itself. It just happens, and suddenly you're lying under a pile of sticks wondering how your perfectly good shelter became a coffin.
The human factor compounds the engineering problem. Most collapses don't happen on day one of a comfortable trip. They happen on day three of an overland push, when the builder is exhausted, behind schedule, and cutting corners to make camp before dark. A ridgepole that's "probably fine." Ribs seated "deep enough." An insulation layer that looks thick enough because you've stopped measuring. These are the decisions made by a tired brain that hasn't eaten in six hours. The forest doesn't care about your fatigue. It will load-test the structure with the same force whether you built it sharp or sloppy.
Ridgepole geometry: Calculating the right length for stability
The ridgepole is the spine of the entire debris hut. Get the length wrong and nothing else matters—the ribs won't sit at the right angle, the entrance will be too short or too wide, and the insulation won't drape properly. Get it right and the rest of the build becomes mechanical.
The working rule: your ridgepole needs to run 1.5 to 2 times the height of the user from the back wall to the front entrance support. For someone who's five-ten, that's a ridgepole between roughly 8.75 and 11.5 feet long. Most beginners undershoot this number. They pick a stick that's "about right" and end up with a coffin instead of a shelter—too short for sitting, too low for heat retention. The ribs end up at a shallow angle, the debris mat sags between them, and the interior volume collapses to a space barely larger than a body bag.
Length isn't the only variable. Diameter matters too. A ridgepole under two inches in diameter will flex under debris load even if the wood is sound. A ridgepole over three inches becomes heavy and hard to position. The sweet spot is a straight, dry, heartwood-sound pole between 2.5 and 3 inches at the base, tapered toward the top. The taper isn't cosmetic—it allows the ribs to seat against the ridgepole at a consistent angle along the entire length of the structure.
| Parameter | Minimum | Recommended | Why it matters |
|---|---|---|---|
| Ridgepole length | 1.5× user height | 2× user height | Determines interior volume and rib angle |
| Ridgepole diameter | 2 in | 2.5–3 in | Resists flex under insulation load |
| Wood condition | Sound heartwood | Standing dead or freshly cut green | Prevents mid-night snap at the center point |
| Support method | Forked stake or lashed crossbeam | Tripod or A-frame lashing | Distributes vertical load across two points |
The wood choice is where most people screw up. Standing dead timber that's been drying for a year or less is ideal—it has the strength of green wood without the extra weight, and it hasn't started to rot. Avoid anything that's been on the ground long enough to develop a spongy texture under the bark. Rap-test the pole: solid wood rings with a sharp tone, rotten wood thuds like a wet cardboard box. Flex-test the ends by torquing them with both hands—sound wood resists and snaps back, punky wood bends and stays bent. If either test fails, throw the pole on the debris pile and find another one. The twenty minutes you spend sourcing a better ridgepole is cheaper than the three hours you'll spend rebuilding in the dark.
Reinforcing the frame: Preventing inward collapse under heavy debris
A ridgepole alone doesn't hold the shelter up. The ribs do. And ribs are where most bushcraft shelters die.
The rib setup is simple in principle: a series of sturdy sticks leaning against the ridgepole at roughly 60 to 70 degrees, anchored at the base, spaced close enough to support the insulation layer without sagging. In practice, every variable in that sentence gets screwed up by beginners.
Anchor depth. This is the first failure point. A rib that's only seated an inch or two into the ground will pivot inward the moment vertical load exceeds the friction holding it in place. The minimum is four inches. Six is better. If the soil is loose or sandy, drive a small cross-stick in front of each rib base to lock it in place. I've seen debris huts where the builder just laid the ribs on top of the ground and wondered why the shelter collapsed before they finished insulating it. That's not a shelter. That's a suggestion.
Spacing. Ribs should run the full length of the ridgepole, touching or nearly touching at the top and spaced no more than 8 to 10 inches apart at the base. Wider spacing lets the insulation mat sag between ribs, creating low spots where water pools and cold air enters. Closer spacing means more work, but it means the debris layer holds its loft and continues to insulate through the night.
Cross-lashing. At the apex where each rib meets the ridgepole, a simple wrap or square lash with paracord or natural cordage locks the angle in place. Without that lash, the ribs can slide down the ridgepole under load, gradually flattening the A-frame until the entire structure pancakes. This is a slow failure rather than a sudden one—but the result is the same: zero insulation, zero structural integrity, and a long night ahead.
The frame failure pattern usually looks like this: ribs seated too shallow, spaced too wide, with no lashing at the apex. Add a heavy debris load, add wind pressure against the sides, and the entire structure torques inward toward the centerline. The ridgepole doesn't have to break for this to happen. The geometry collapses on its own, the way a house of cards collapses when the bottom row gets bumped. Force follows the path of least resistance, and a debris hut without anchored ribs is a structure that's begging to be torqued apart.
The insulation threshold: Why 2-3 feet of debris is a survival minimum
A debris hut with a perfect frame will still kill you if the insulation is wrong. This is the part beginners consistently underestimate, because they think in terms of "covering" the shelter rather than burying it.
The thermal principle: the thicker the debris layer, the more trapped air it holds, the higher the R-value. A thin layer of leaves draped over the ribs is essentially worthless—it compresses under its own weight, lets wind strip it off the sides, and conducts cold straight through to your body. A thick debris mat, by contrast, creates a still-air buffer that holds radiated body heat inside the structure.
The working minimum is 2 to 3 feet of debris, measured from the rib surface to the outer surface of the insulation pile. That sounds excessive until you watch a debris mat compress by half its loose volume within the first hour under its own weight. A pile of leaves you raked on at eighteen inches will settle to nine inches overnight, and nine inches is barely better than nothing. Settling is the silent killer of debris hut insulation. What looks like overkill at the build stage is exactly the right amount at 3 a.m.
Three rules for effective insulation:
1. Loose fill first, then structural fill. Start with a fluffy base of dry leaves, pine needles, or fern fronds piled against the rib layer. This is the trapped-air insulator. Cap it with a denser layer of boughs, bark strips, or grass clods to shed water and prevent wind stripping.
2. Cover the entire shelter, including the entrance end. The most common mistake is piling insulation only on the sides and back, leaving the front of the ridgepole exposed. Cold air enters from every unprotected surface. If you're not insulating the entire envelope, you're not insulating at all.
3. Replenish after settling. Come back an hour after initial build and add another six inches of debris on every surface. The compression cycle doesn't care about your schedule. Plan for it.
The materials matter too. Dry oak and maple leaves insulate better than pine needles on a per-volume basis, but pine needles resist compression better over multi-day use. The best debris hut insulation is a mixed layer: leaves for loft, boughs for structure, and a final cap of bark or evergreen boughs to shed precipitation. This isn't a precision-engineered building envelope—it's a thermodynamic workaround, and every layer earns its place by solving a specific failure mode.
Beyond the frame: Managing hypothermia risks in cold environments
The shelter buys you time. It does not generate heat.
The shelter is only one leg of the survival tripod. Even a perfect debris hut won't save you if the other two legs—clothing insulation and fire management—are neglected. I learned this lesson at 4 a.m. in the rain, when my rebuilt lean-to was functional but my fire had gone out twice and my base layers were soaked through from the original collapse.
The hard threshold: hypothermia can set in at 50°F / 10°C in wet or wind-exposed conditions. That number is non-negotiable. It's not a polar risk, it's a wet autumn night in the mid-Atlantic. The body loses heat faster than it can produce it through shivering once clothing becomes saturated, wind chill drops effective temperature, or the insulation layer collapses to near-zero. A debris hut failure at 48°F puts you in the same physiological territory as a broken tent at 20°F—the math compounds, and the margin for error disappears.
The shelter buys you time. It doesn't generate heat. So while you're building your debris hut, you also need to manage three other variables:
Stay dry. Wet cotton is a death sentence. Synthetic base layers or wool continue to insulate when damp. A wet shelter occupant loses heat twenty-five times faster than a dry one. The debris cap layer—boughs, bark, evergreen branches—is the most underrated piece of the entire build. It sheds water that would otherwise percolate through the insulation and soak the occupant from above. If you skip the cap layer to save twenty minutes of build time, you've built a shelter that will fail you in the first sustained rain.
Maintain fire capability. A fire inside or immediately adjacent to a debris hut is a calculated risk. The smoke will eventually force you out, and the structural fire risk is real. The better play is a fire built six to ten feet in front of the entrance, angled to reflect radiant heat into the shelter opening. This setup keeps the occupant warm, the shelter dry, and the fire away from the structural frame. A well-positioned fire can add ten to fifteen degrees of effective warmth to a properly built shelter. Skip the fire and that warmth has to come entirely from your own metabolism.
Manage the sleeping surface. Ground conduction steals body heat faster than air convection. A four-inch layer of dry debris between you and the ground is the difference between a survivable night and a critical one. I've crawled into debris huts with perfect insulation overhead and an inch of bare dirt beneath me, and the cold came up through my hips within twenty minutes. Build the floor the same way you build the walls. The ground doesn't care about your overhead insulation.
The cold math of survival shelter
A bushcraft shelter isn't a structure. It's a thermodynamic system that you assemble with sticks and leaves to keep a small bag of warm water (you) from losing heat faster than it can produce it. Every component—ridgepole length, rib spacing, debris depth, entrance position, floor insulation, fire placement—is a variable in that equation. Get one wrong and the system fails. Get two wrong and you're climbing out of a debris pile at three in the morning, shaking, in the rain, trying to rebuild in the dark.
The collapse taught me three rules I now refuse to skip:
1. Test every load-bearing stick before it goes into the structure. Rap-test for rot, flex-test for green wood that won't hold a load, eyeball-test for straightness. If any test fails, the pole doesn't go into the shelter.
2. Build the insulation thicker than you think you need. Two feet minimum at the start, three feet if the debris is wet or the temperature is below 50°F. Settling will halve your volume overnight. Plan for the half, not the whole.
3. Treat the shelter as one part of a three-part survival system. Frame, insulation, and fire management are not independent choices. They're coupled variables. A perfect shelter with a dead fire and soaked base layers is still a hypothermia scenario.
Forty-eight degrees and wet. That's not a survival horror story from the Yukon. That's a Tuesday in October in the Appalachians if you build wrong. Build the frame right, bury yourself in debris, keep the fire alive, and the night becomes a memory instead of a medical event. The math is simple. The execution is not. And the forest will load-test your work the moment you stop paying attention.